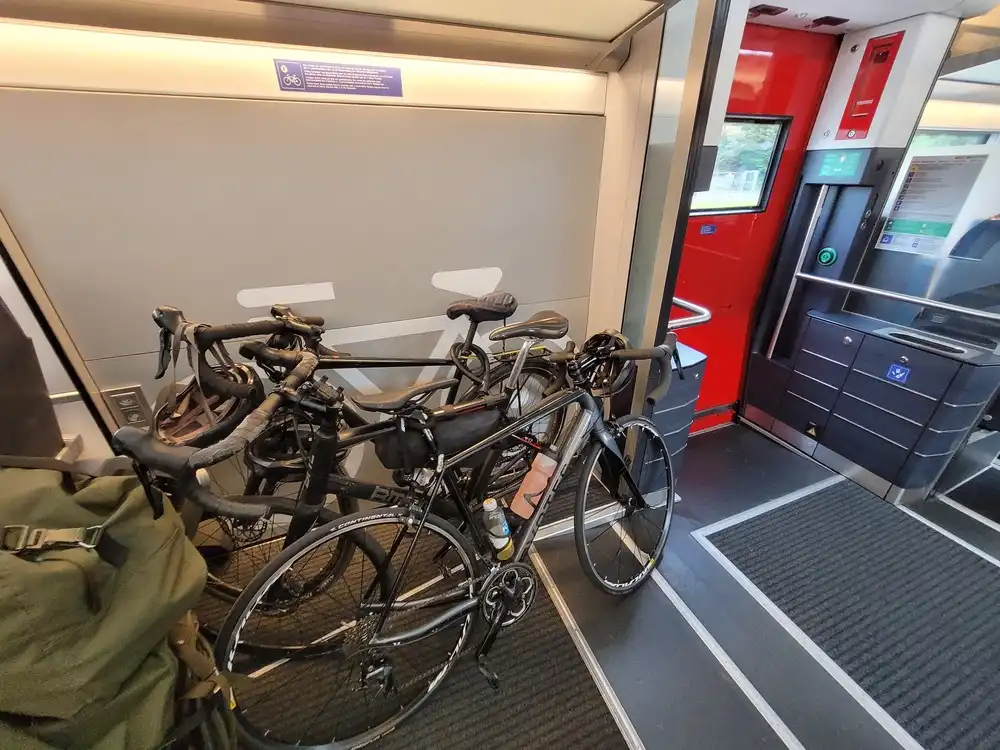
A practical guide to bring your bicycle on trains around Europe
by
@cycling_on_rails | Strava | RSS
Over the last years, I have brought my (road) bicycle on many trains across Europe, and friends have started asking me for advice on how to go where, how to book reservations, etc. Indeed, each railway operator has its own rules regarding bicycles, and practical information is often hard to find. So I thought: why not create a website to share my experience with the community?
This guide is here to fill this gap, with a primary focus on bringing a regular road bicycle on board, which is the interesting size. Smaller foldable bicycles are generally straightforward to bring on public transport, while larger bicycles such as tandems or cargo bikes are rarely accepted on board.
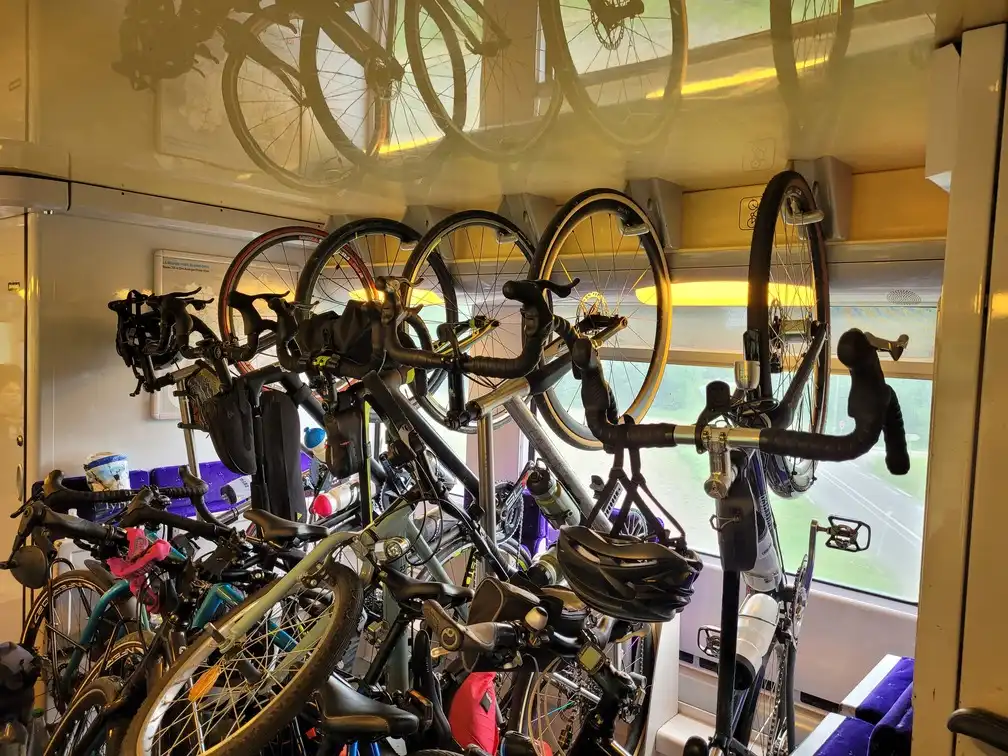
This guide is meant to summarize practical experience: although it’s hard to be objective as each experience is unique (how crowded was the train? what bicycle did you bring? how the staff behaved? etc.) and inherently subjective (everyone has different expectations in terms of comfort, information, help from the staff, etc.), I’m aiming to provide factual information illustrated with pictures.
On this page, you’ll find general advice that should apply to many railways across Europe. I also recommend you look at the country-specific pages, to get more tips about how the trains look like in the places you’re visiting, what are the specific rules, or how to plan your cycling routes.
Enjoy the journey!
 Lost navigating this? Read on to learn more!
- Country-specific guides
- How to travel with an assembled bicycle?
- How to transport a bicycle as luggage?
Country-specific guides
Given that each railway operator has its own rules, I created more specific guides for the following countries. I’m starting small because I want to give concrete and useful advice based on experience and illustrated with pictures, rather than just repeating the official rules. This list will be growing over time.
If you visited one of these countries and had a different experience, don’t hesitate to contact me so I can improve the guides. If you visited another country and want to share your experience with the community, that’s also very valuable, as crowdsourcing information from more people will allow the list of countries to grow faster.
This map is derived work1 licensed as CC BY-SA 2.5.
Pictures available:
Under construction:
- Belgium
- Bulgaria
- Croatia
- Estonia
- Finland
- Greece
- Hungary
- Ireland
- Latvia
- Lithuania
- Luxembourg
- Netherlands
- Norway
- Portugal
- Romania
- Serbia
- Slovakia
- Slovenia
- United Kingdom
For other countries, you may also check the post Taking a bicycle on a train in Europe in 2024. A comprehensive guide. on the Wobbly Ride blog.
How to travel with an assembled bicycle?
When traveling with your bicycle on a train, you basically have two options.
- Bring your bicycle as is and directly board the train.
- Disassemble your bicycle and store it as “large luggage” in a dedicated bag.
The first option seems the most obvious and straightforward. However, it comes with some caveats: you often have to pay an extra fee and/or reserve a dedicated spot in advance. To know which conditions apply, you’ll have to check country-specific rules and in particular for the type of train(s) you’ll take (regional, intercity, high-speed, low-cost, etc.).
For a while, many operators either allowed you to bring your bicycle on board for free, or by paying a bicycle ticket, which was reasonably easy. However, because bringing bicycles on trains is becoming increasingly popular (for good reason!), more and more operators mandate that you reserve a dedicated spot for each bicycle in each train.
In principle, you might think it’s good: if you reserve then you are sure to have a spot for your bicycle (similarly to reserving a seat). In practice, there are many things that could get in your way.
- Booking a bicycle spot may cost an extra fee.
- Often, there will be no bicycle spot left if you travel at peak times and/or book at the last minute.
- Some trains don’t offer any spot for assembled bicycles (although the European Union now mandates new trains to have bicycle spots).
- Sometimes, you cannot reserve a bicycle spot on the regular booking platform: there may be a separate website for bicycle reservations (additional malus: only available in the local language), or you may have to call a number or reserve in person at the counter in the station.
- Sometimes, you can only buy a bicycle reservation together with a regular ticket, complicating things in some scenarios: booking a bicycle spot if you’re using an Interrail pass (and don’t need a regular ticket), booking a round-trip with a bicycle spot only in one direction, booking a group ticket with fewer bicycles than people, etc.
- Even if you managed to reserve a spot, your train might be canceled and there may not be any bicycle spot available on the next train or in the replacement bus (even though the European Union regulation entitle you to re-routing/reimbursement, compensation and assistance).
My take is that bicycle reservations are fine for simple journeys (one or two trains), but get more annoying and risky for complex journeys with many connections and crossing several countries. However, don’t despair, bringing your bicycle is still generally possible, by packing your bicycle in a bag. Even you’re not planning to use it, I recommend bringing a bicycle bag and getting familiar with it, which can save you time and trouble if a delay, cancellation or other disruption affects your journey.
How to transport a bicycle as luggage?
Transporting you bicycle as “luggage” starts with getting a dedicated bag that can safely store your bicycle with some parts disassembled (typically the wheels). This bag should also be convenient (when you walk with it in the train or on the platform) and avoid damaging your bicycle.
There are many models of bicycle bags, from the minimalist where you just disassemble the front wheel, to the sturdiest boxes where you remove both wheels and potentially other pieces like the saddle or the handlebar. They come with various trade-offs, such as:
- protection offered to the bicycle (against scratches or damage),
- size of the luggage with the bicycle inside (to compare with the luggage dimensions allowed by the railway operator),
- size and weight of the bag/box when unused (to transport it with you when you cycle),
- time (or tools) needed to disassemble and reassemble the bicycle,
- type(s) of bicycles that fit in the bag.
This section is here to help you choose the best bag for your use case, illustrated with some transport bags I’ve used.
This isn’t an endorsement of these specific models, I’m not in any way affiliated with them. These are simply the bags I have, but there are plenty of other brands and models available.
Front wheel removed
The first type of bag lets you remove the front wheel and place it next to the bike frame while turning the handlebar. Compared to a fully assembled bicycle, this packing mainly reduces the height (except the saddle but you may also remove it) and the width (due to turning the handlebar); the length only decreases a bit.
Some examples of models:
- TranZbag Road (shown in detail below),
- Decathlon Light Compact Bikepacking Bag (reference: 8771131),
- Buds Roadbike Light.
Advantages:
- A lightweight and compact transport bag when folded.
- Packing and unpacking is relatively fast.
Disadvantages:
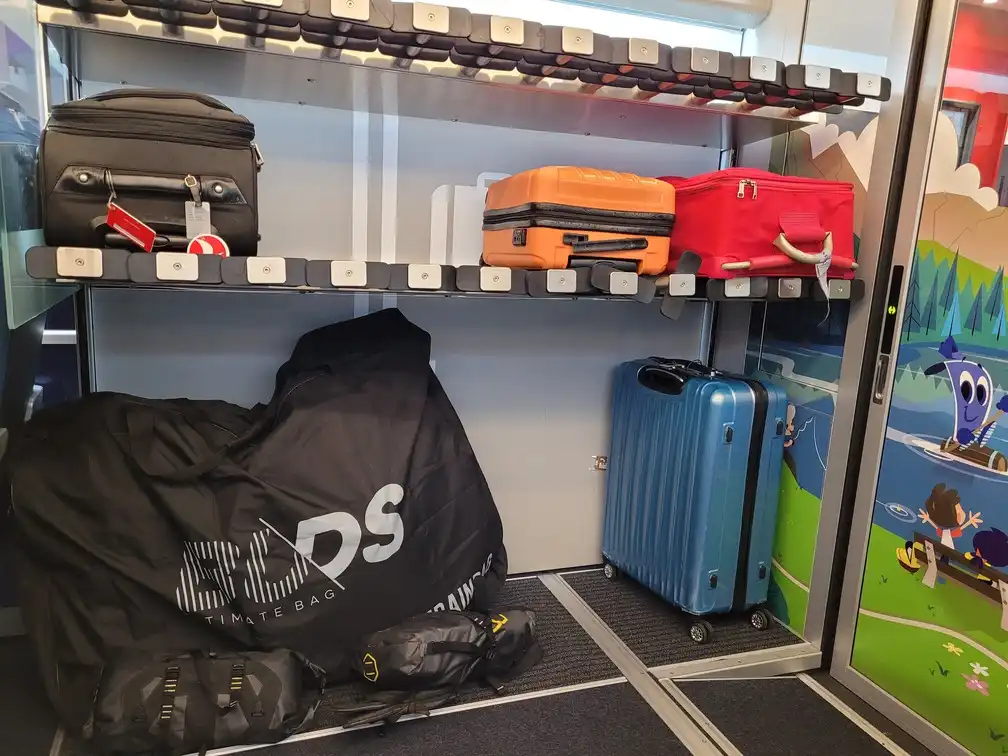
- This setup isn’t the most compact with the bicycle packed inside. It doesn’t fit in all luggage racks and exceeds some railways’ official maximum dimensions (so make sure to consult the country-specific rules).
In practice, this setup generally works even when it’s slightly above the allowed dimensions, as long as you place it properly to not disturb other passengers nor block corridors. I have never seen a conductor actually measuring luggage size, but staff might require to put all luggage in racks (where a too large package won’t fit), and rules can be more strictly enforced with low-cost operators. If you’re not comfortable with some risk of being denied entry or having to pay a fine for oversized luggage, consider a bag with 2 wheels removed.
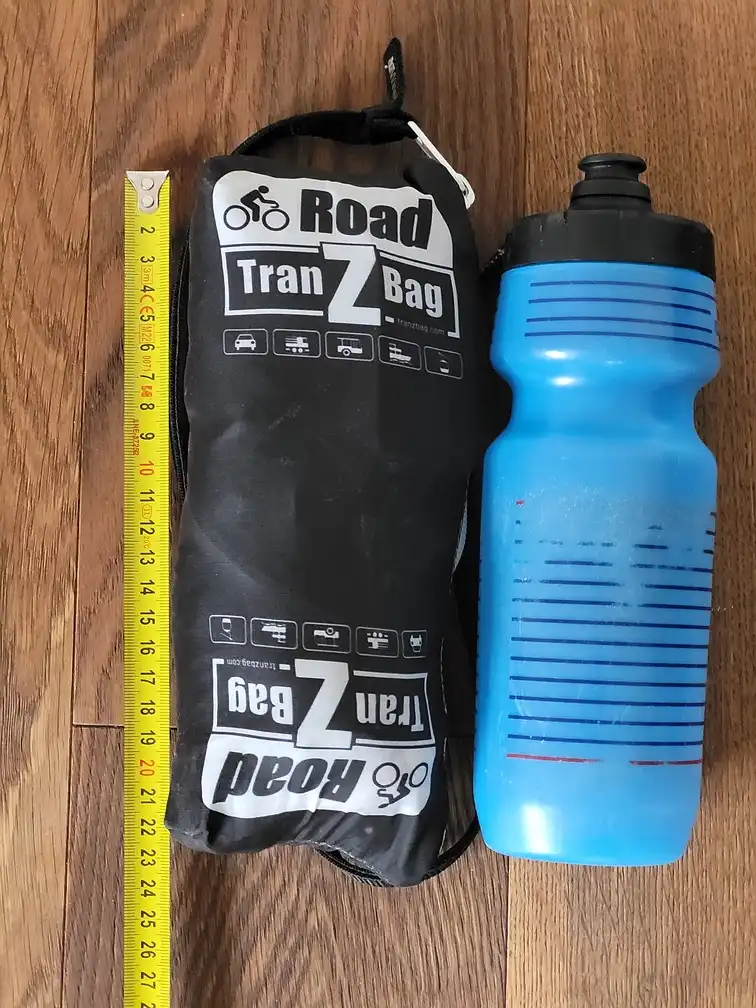
Still, the bag with one wheel removed is my primary choice as the minimal weight and volume are convenient to cycle long distances. My bag takes the volume of a water bottle and weighs less than 400 grams.
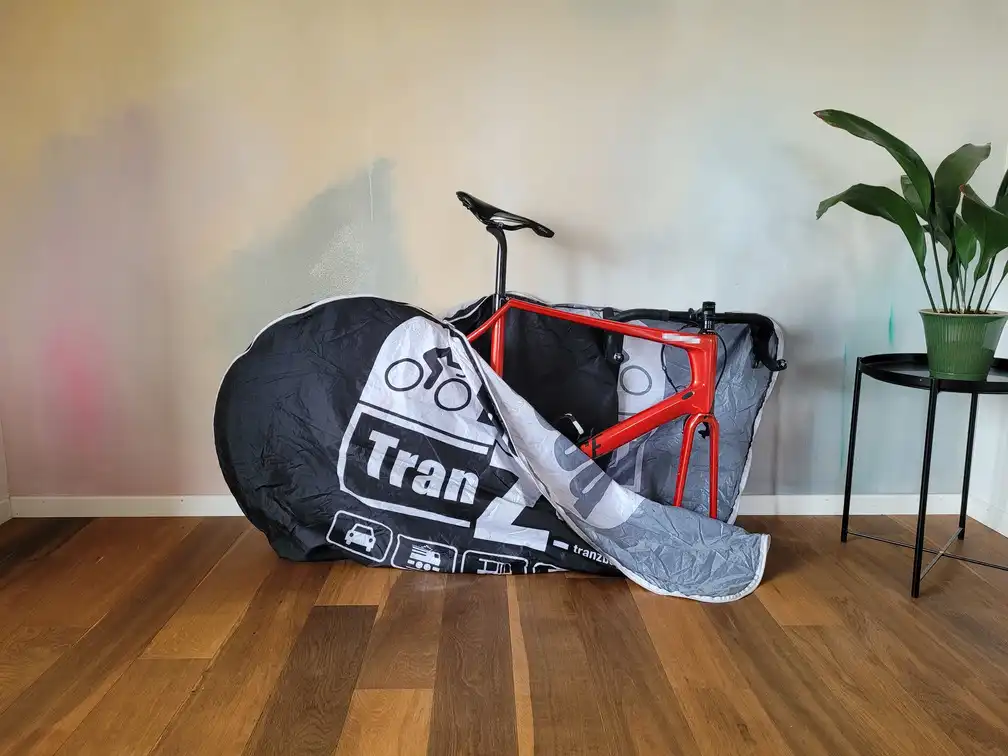
Here are some pictures of the packing procedure for the TranZbag Road model I have. It really shines by its compactness, although a strap would be useful to carry the bike or attach it somewhere in the train (take that into account when choosing your model).
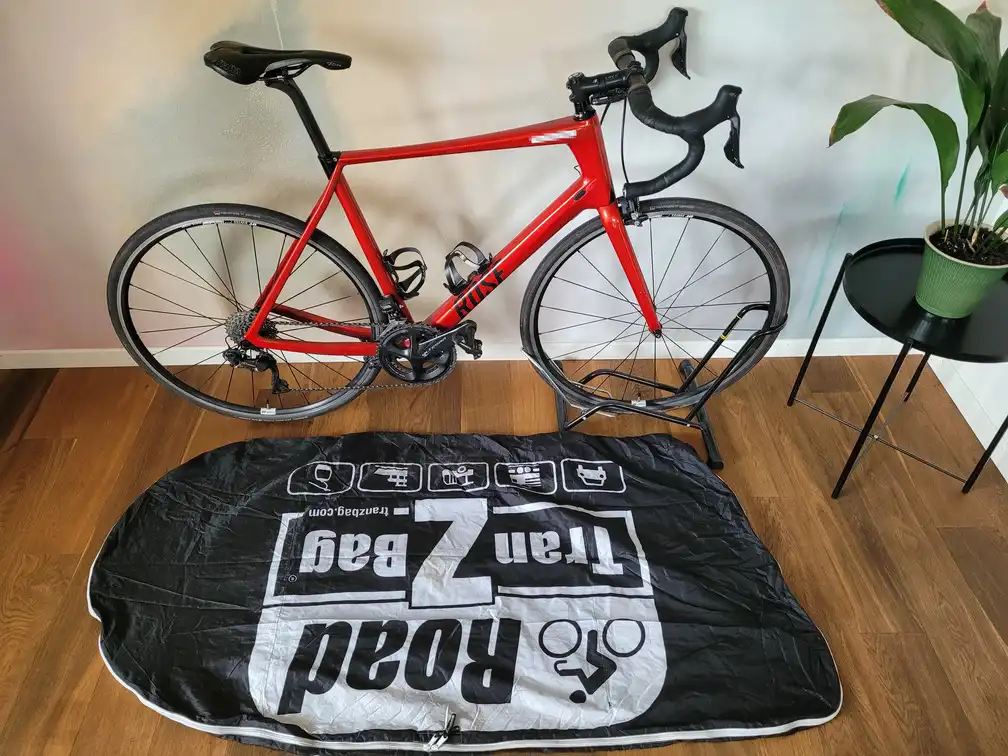
You first remove the front wheel and place it in a dedicated pocket.
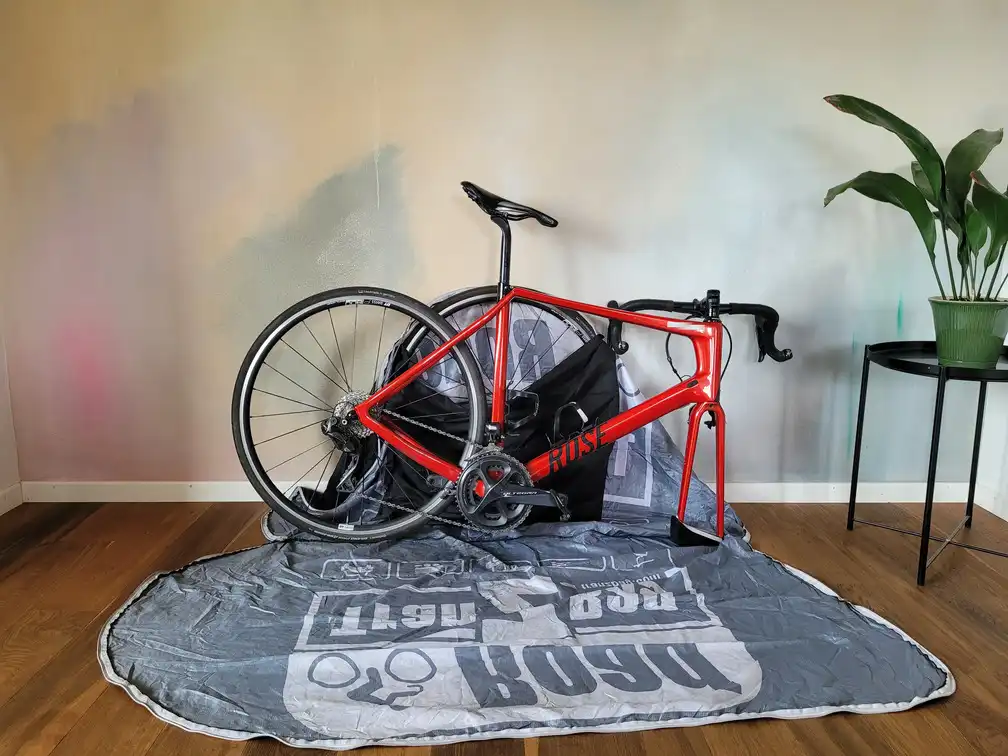
The bicycle then comes placed above the bag. Be mindful of the direction: the rear wheel goes on the rounded side of the bag while the handlebar goes on the straighter side.
After zipping the rear wheel, the bag takes its final shape.
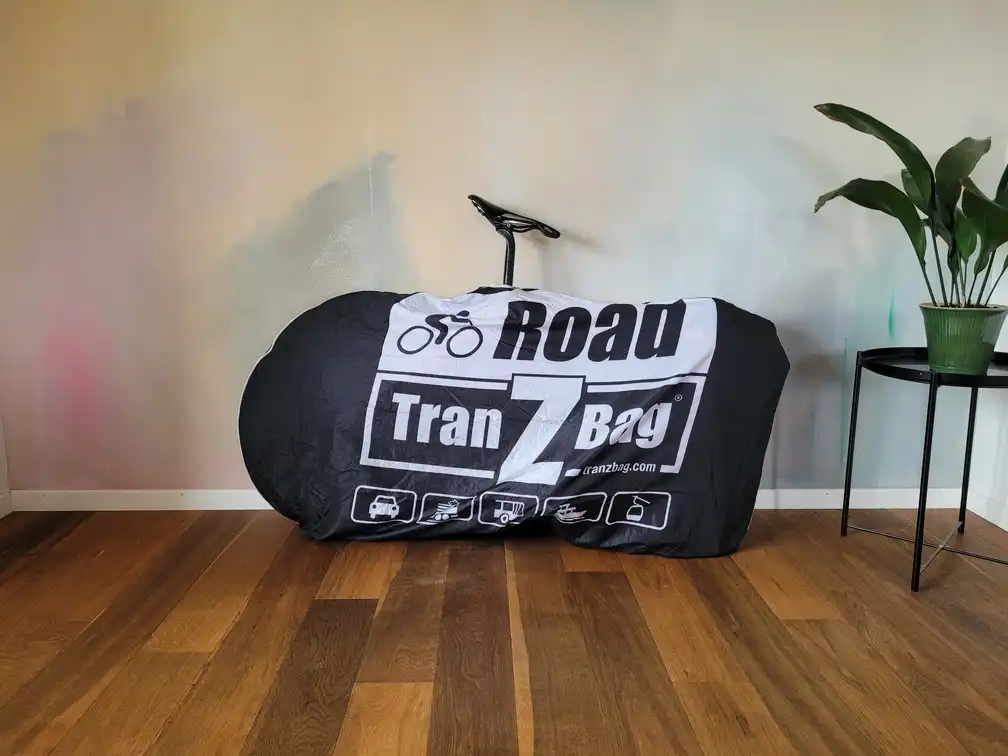
And with the front zip closed, only the saddle stands outside. Some operators may require you to remove the saddle to that everything fits inside the bag, so have some tools ready if needed.
Both wheels removed
With the second type of bag, you remove both wheels and place them around your frame in the bag. This decreases the bicycle length by a good amount, which is basically the only advantage of such bags. Compared to the “front wheel removed” configuration, the height is the same and the width is larger as there is one more wheel next to the bike. In practice, this extra thickness isn’t necessarily better depending on the configuration inside the train.
Some examples of models:
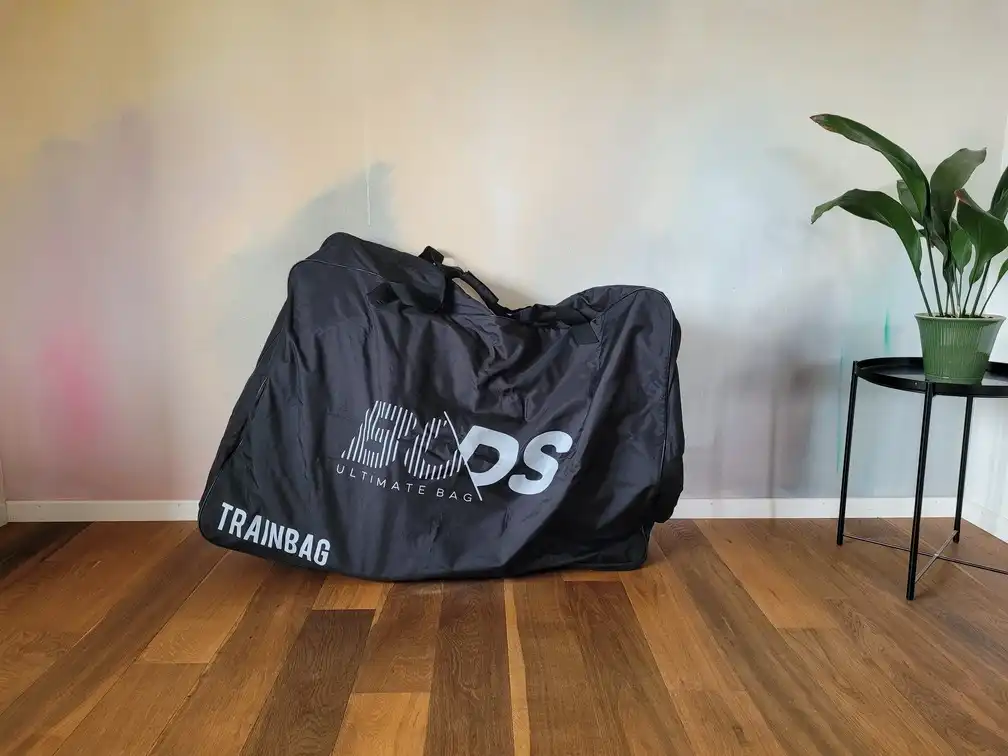
- Buds Trainbag (shown in detail below),
- Decathlon Bike Transport Cover (reference: 960035).
Advantages:
- The packed bicycle is more compact and fits in the official maximum dimensions of most railways.
Disadvantages:
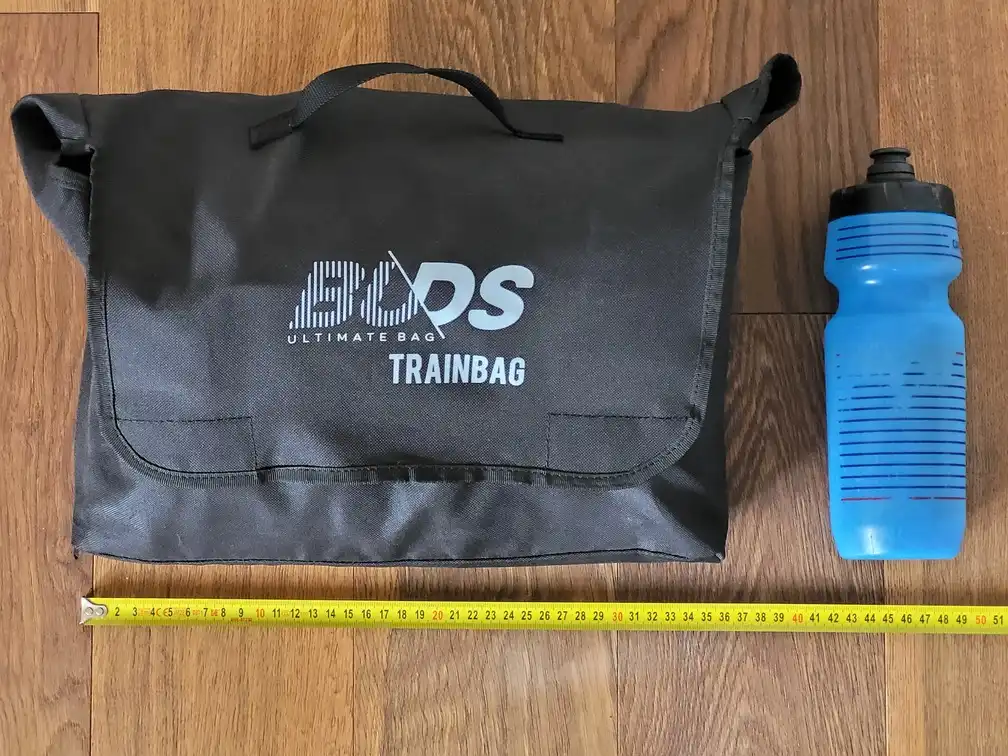
- These bags are usually heavier and take more space when folded than the 1-wheel-removed bags.
- Packing/unpacking takes more time.
- The mechanical parts around the rear wheel (chain, derailleur) are more exposed. You should use additional protections to reduce the risk of damaging them, but this increases the packing/unpacking time and means more weight and volume to carry for the rest of your trip.
I don’t really use this type of bag anymore. Even though it fits the official packed dimensions, the folded bag I have is just too large and inconvenient to carry on a long cycling trip, and it requires care to avoid damaging sensitive parts like the derailleur.
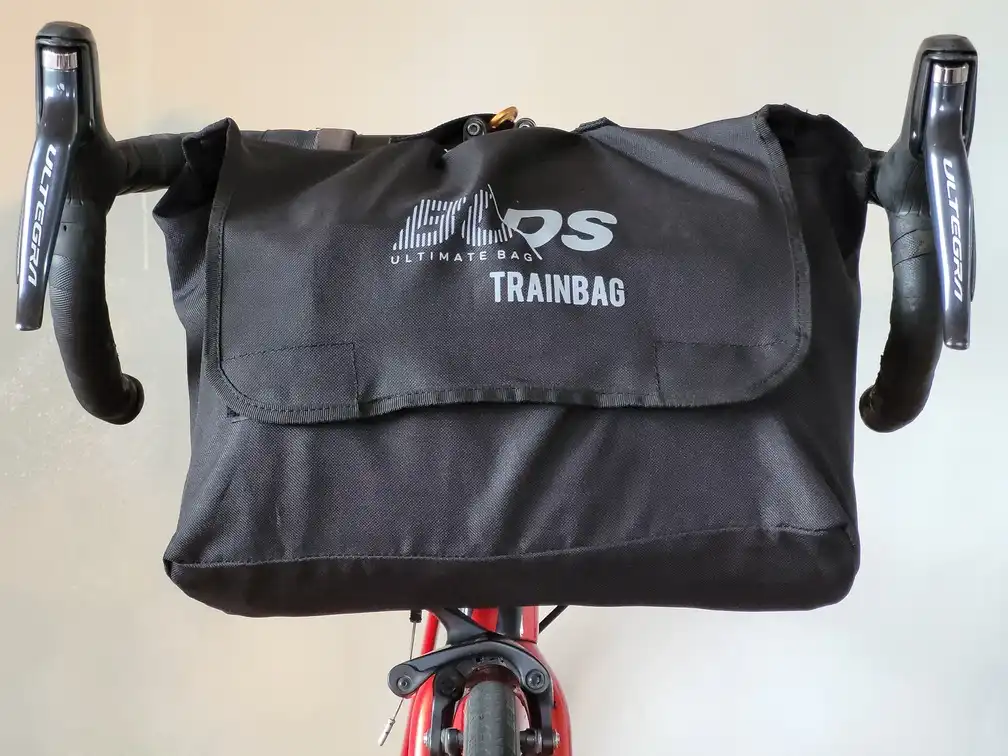
The Buds Trainbag I have has a thicker fabric than the TranZbag Road shown above, but it’s quite larger. To give you an idea, it takes most of the space under the handlebar in folded mode (without any strap provided to attach it like this). I prefer to use this space to put a handlebar pack for my clothes or other items.
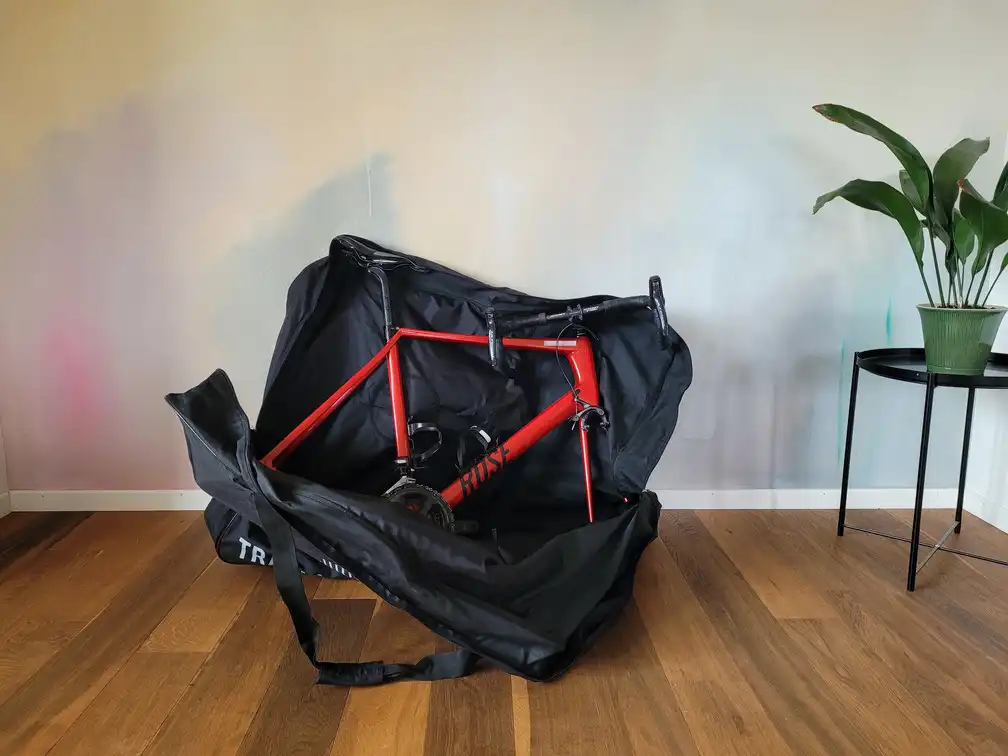
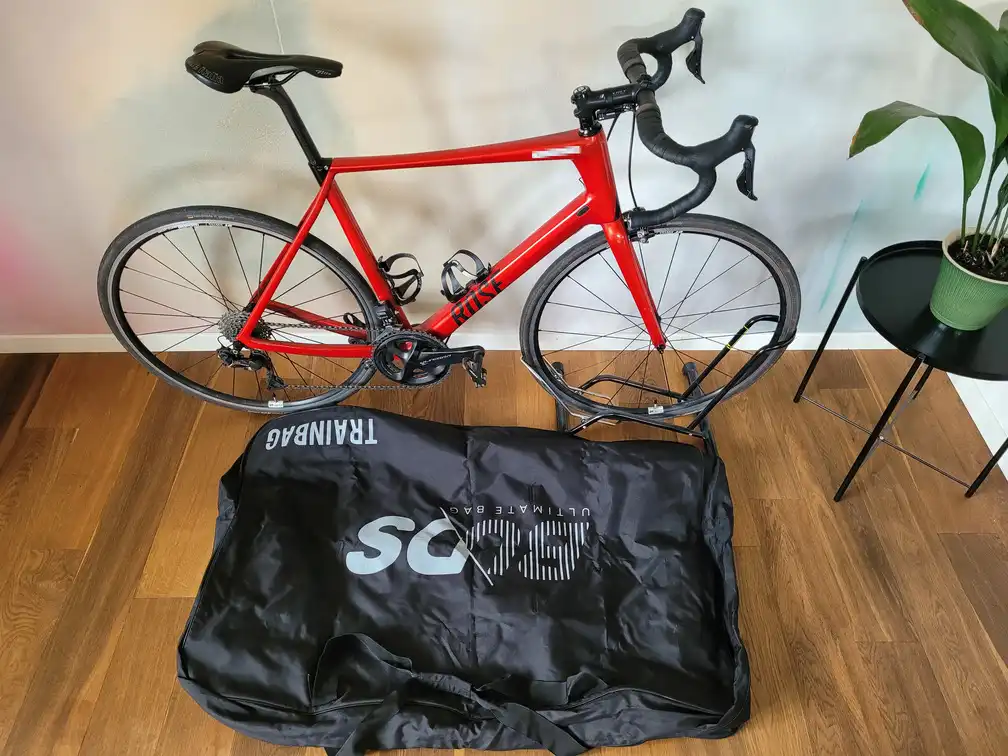
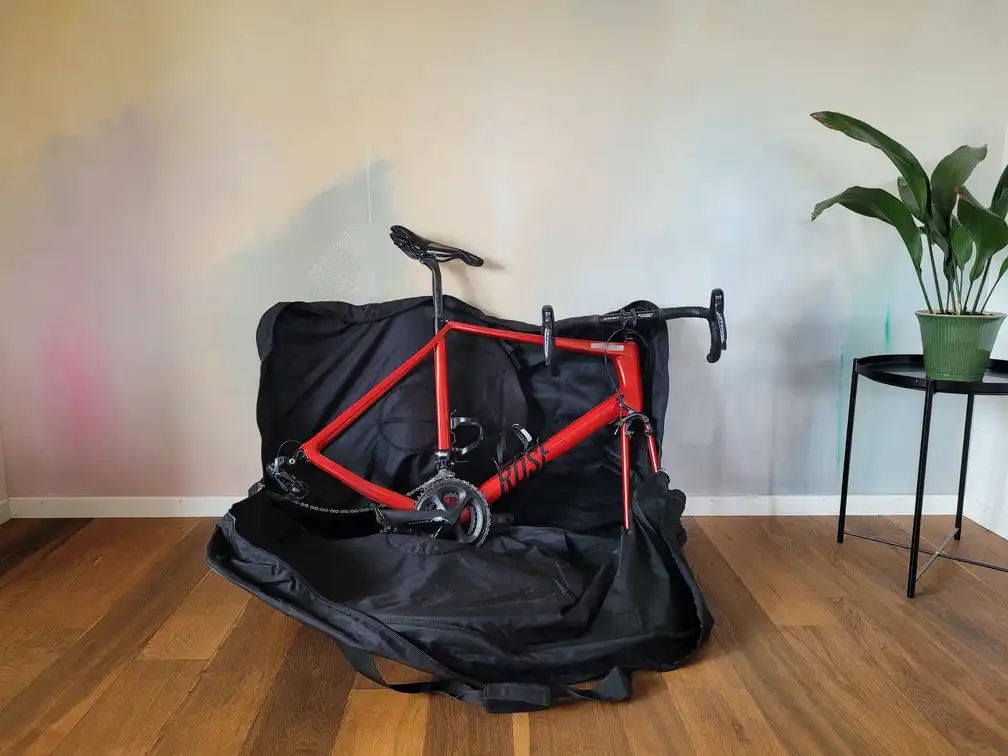
Here are some pictures of the packing steps. As you can see, the pack is smaller than the bike, especially in length.
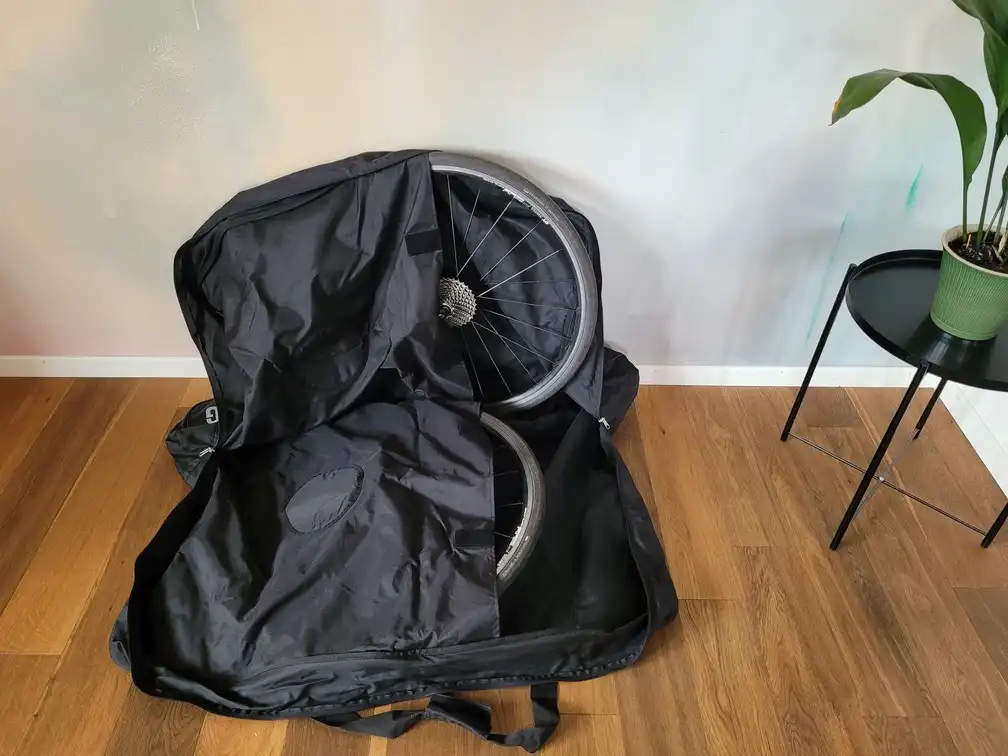
Packing starts by removing the wheels and putting them on dedicated pockets inside the bag.
You then place the frame in between. As you can see, the chain is loose and may move during transport, and the derailleur ends up in the lower-left corner of the bag, where it can get damaged if you’re not careful putting the package on the ground (or if other passengers aren’t careful with their luggage).
After pushing the frame down, it fits in the package.
Let’s close the zip and ready to go! The strap is convenient to carry the bag and to attach it to any kind of fence or bar you’ll find in the train.
Comparison and other options
Here is a summary of the options, with measurements on my bicycle. The packing time is an estimate, which will vary with experience. I anyway recommend coming enough in advance at the train station, which will also allow you to find a better spot in the train and put your bicycle before all the space has been taken by other luggage.
| Bag type | Packing time | Bag weight | Packed bicycle size | Folded bag size |
|---|---|---|---|---|
| None | 0 min | 0 | 170x102x47 cm | N/A |
| 1 wheel removed | 5-10 min | 380 g | 153x74x29 cm2 | 23x9x7 cm |
| 2 wheels removed | 10-20 min | 1380 g | 117x89x35 cm | 36x25x18 cm |
So far I’ve shown the two options that I find the most practical, but there are others. Some brands like Evoc offer sturdy bags that look more like luggage (with wheels to drag them on the floor). The interior is similar to the 2-wheels-removed setup, but with more straps and padding to make sure the parts don’t move nor scratch each other. The outside is thicker and solid which should prevent damage, and typically ends up a bit larger than the 2-wheels-removed setup.
The main downside is that such boxes weigh around 10 kg and cannot be folded, so you cannot take them with you when you cycle. This option only works if you stay in one place during your trip (or do a loop and have a way to store the box in the meantime) and this place is close to a train station (or you have a taxi to drive you where you stay). Also, these sturdy boxes cost around 500-1000€ whereas the foldable bags cost 50-100€.
-
Map derived from the wagonWEB photogallery map itself derived from the Blank map of Europe from Wikipedia Commons. ↩
-
The height of 74 cm is excluding the saddle. With the saddle the height is 97 cm. ↩
